Common Cartridge Failures
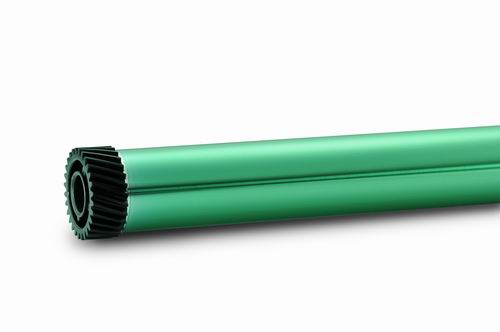
OPC Drum Failure
The most common cartridge failure is predominantly due to the drum. The drum has the wiper blade scraping any excess toner off the surface as well as the paper or Transfer Belt rubbing against it as it prints. Common OPC drum failures are:
Perfectly straight and very thin vertical line running full length of page:
Indicates a scratched/ringed drum generally from foreign matter or build up of toner on the Wiper Blade, which scratches/rings the Drum during rotation.
Dots that repeat equidistance down the page:
Indicates a chip in the drum surface, referred to commonly as a “pinhole”. The distance between the dots is dependent on the circumference of the drum (generally 4 times). Some pinholes, on closer inspection, can be built up foreign matter which can be removed/cleaned with a cotton tip and Iso-Propyl alcohol.
Dots that repeat equidistance down the page, some are accompanied with a full horizontal band across the page:
The dots indicate a pinhole and the band across the page. Indicates a short/spike against the PCR, which is due to the pinhole.
Smears of toner across (horizontal) page and are equidistance apart (vertical):
Caused by light damaged drum coating (sunlight). The distance between the smears is dependent on the circumference of the drum, generally 4 times. Exposing the Drum to direct light for long periods of time damages the coating/film.
Full thin line across the page, equal distance apart:
Calculate the circumference of the drum and if the thin lines are the same distance apart as the Drums circumference then the Wiper Blade has marked the Drums coating. This generally occurs with periods of time where the WB rests against the drum (storage). Heat can play a role in this.
Grey “tyre tracks” on right or left side of page:
This failure is also sometimes described as wind blown sand. It is caused by a worn out drum. Drum coating or film starting to wear thin

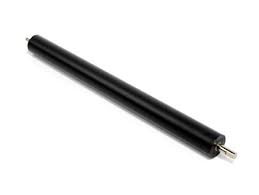
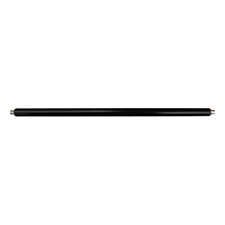
Wiper Blade Failure
The next most common laser cartridge failure to occur would be due to an issue with the Wiper Blade. After the image is transferred from the Drum to paper or Drum to Transfer Belt there will be residual waste toner on the Drums surface which needs to be cleaned before the next revolution of the Drum. The Wiper Blades job is to collect/clean/scrap any residual waste toner from the Drums surface, depositing it into the waste toner hopper.
Thin line down the page:
This is caused by a cut or nick in the blade which fails to collect/clean/scrape toner from the drums surface
effectively leaving a lined mark down the print. This can also be attributed to a worn blade.
Grey page with toner visible on drum:
The Wiper Blade isn’t applying adequate pressure to the drum to successfully clean the residual toner from the drum, which then gets applied to the next revolution of print. This is often due to the Wiper Blade not being correctly fixed in place (not screwed down properly, incorrect sealing foam etc).
It can also be caused by and old wiper blade that has gone hard over time. The stiffened blade does not apply adequate pressure to the surface of the drum limiting the collecting/cleaning/scraping capability of residual toner. An indicator of an aged Polyeurethane Wiper Blade is a yellow tinge.
Poorly lubricated blade, seizing drum revolution:
The Wiper Blade constantly applies pressure to the Drum, if the blade is poorly lubricated will stick to the drum and travel in the same direction. Once the Blade has flipped it will apply immense pressure to the drum often seizing it completely or requiring a fair amount of force to turn. Generally this will be accompanied by a loud clicking noise from the printer, thankfully the printer has a clutch to prevent stripping of gears. You will see some compatible colour cartridges using Yellow toner as a lubricant, the Yellow toner tends to be finer/smoother and works quite well as a form of powdered lubricant.
Magnetic Roller Failure
The Magnetic Sleeve is a coated aluminium roller that transfers the toner from the supply chamber to the drum by use of magnetic attraction; to break it down the Mag Roller sleeve encases a Magnet in the same shape as the Mag Sleeve. There is an electrical contact at the end of the sleeve to which a charge is applied to amplify the magnetic attraction. The (generally) black conductive coating found on the Mag Sleeve is made of various conductive materials with the sole aim of carrying the toner. Most failures are usually due to scratches or excessive wear of the coating. Toner particles in general are abrasive, when combined with pressure from the doctor blade doctoring/pressing toner against the Mag Sleeve roller causes wear to the coating. Some cartridges use a Developer Roller in place of a Magnetic Roller, this piece will be covered in a separate fact sheet to come.
Light print:
A worn out magnetic roller is probably the main reason for a light printing cartridge to occur. There is a black conductive coating that wears off
the sleeve over time. If the coating on the Mag Roller were to wear thin or completely through, you would be able to visually sight the black conductive coating turn pale (wearing thin) or even revealing the under aluminium tubing. This type of failure will show up more on solid black areas and grey scales. Normal text wouldn’t normally reveal this type of issue.
White voids in the print:
This is caused by scratches or gouges in the coating of the Mag Sleeve. Normally one or two scratches wouldn’t pose a problem however the more scratches there are then the more potential voids there will be. This is especially true when the scratches are all in the same general location.
Light and dark banding across page:
This is caused by a bent or warped magnetic roller. This normally happens when a hub (especially the metal ones) is pressed into the sleeve at an angle. Metal hubs should be removed and replaced with a special press or with delicate care.
Intermittent printing:
A Mag Sleeve contact transfers charge from the printer to the conductive black coating on the surface of the Mag Sleeve. If the contact is bent out of shape, too much electrical grease applied or installed incorrectly it can print either light or blank pages (most often blank).
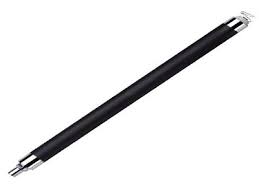
PCR (Primary Charge Roller)
The PCR is a roller which controls the charge being applied to the Drum Cylinder. Basically it places an initial uniform charge on the drum then towards the end of the cycle erases the residual charge once more applying a uniform charge. This leads into the next print cycle (each revolution of the drum is considered a ‘cycle’). Because of this dual role, there are some severe failures which can come from the PCR. Most of these failures will show up more in winter where the humidity is low rather than in summer when it is high (this is due to Static build up).
Ghosting:
Ghosting is commonly known as repetition of print already applied to the page (duplication). It is more commonly seen replicating dense print however can repeat all density levels depending on the severity of additional charge (the replicated print is produced in lower density almost producing a silhouette replication of the print, hence the descriptive term ‘Ghosting’). A ghosting issue in general is derived from a charge related problem. This can occur when the outer coating of the PCR is faulty (too much cleaning fluid) or too much conductive grease is applied to the PCR Clips/Housing.
A cut or hole in the PCR:
This results in a repetitive black mark at equal distance to the circumference of the roller. Sometimes these marks can short out across the Drum Cylinder creating excess charge across the drum attracting additional toner when produces a dark ‘band’ horizontally across the page. The markings and ‘bands’ will be repetitive in nature (7+ repetitions down the page).
Random dots across the page:
These can either be black dots, or white dots in black areas. This is caused by excess lubrication powder sticking to the PCR. These dots will be repetitive in nature depending on the circumference of the PCR (7+ repetitions down the page).
Vertical marks on print, generally found on the LHS or RHS of page:
If the cartridge is still fresh and markings appear on the print in a blob or smear like fashion, generally this means the PCR has been marked with conductive grease. Commonly it will be located on the LHS or RHS of print near the PCR Clip/Housing (accidental conductive grease application to PCR coating). If continual printing is done, the grease will smear and transfer to the Drum
effectively giving a poor print vertically in the smear zone.
The Developer Roller
A Developer Roller is a metal shaft covered in Silicon Rubber with a specially designed surface coating. Both the coating and Silicon Rubber help in storing and releasing electrical charge. The Dev Roller is much like a Magnetic Roller, as they both help in the transferral of toner from toner supply chamber (hopper) to the Drum. The main difference between the two is how they deal in attracting and repelling toner; a Magnetic Roller utilises Magnetic Charge, where as a Developer Roller utilises electrical charge to attract and repel. Magnetic based toner will use a magnetic roller, if the toner is charged then a developer roller is used.
Light Printing:
A worn or dirty Developer Rollers’ surface coating is often the issue for a light print to occur. The Coating wears off
over a period of time and can be accelerated from other factors, such as environment (heat), inadequate Doctor Blade pressure or incorrect/dirty surface coating material. This type of failure will show up more on solid black areas and grey scales. Normal text won’t easily reveal this type of issue unless severe. Essentially less toner is attracted to the Developer Roller than normal.
Dark or Excessive Print:
Dark or excessive print on the page can be due to incorrect cleaning products being applied to the Developer Roller. The surface coating is a fragile balance of components/materials to aid in attracting or repelling specific toners. This balance can be disturbed when cleaning products are applied, which strip or leave additives (residue) on the surface coating. Majority of cleaning materials (looking at you Iso) are too harsh and end up stripping some of the coating. This allows the Dev Roller to overcharge causing excess toner to be attracted – which leads to dark or excessive prints.
Repetitive coloured marks equal distance down the Print:
Repetitions measured at the same circumference as the Developer Roller (smaller circumference) will indicate the Dev Roller has been marked. This can occur from sudden force damaging the surface coating of the Developer Roller
Repetitive coloured horizontal lines equidistance down the Print:
Repetitive lines measured at the same circumference as the Developer Roller (smaller circumference) will indicate the Dev Roller has been marked. This generally occurs from gradual force from the Doctor Blade pressing into the Developer Roller eventually pitting the roller out of shape.
Brother TN3440 Toner Reset
HL-L6200 HL- L5000D HL-L5100 HL-L5200D HL-L5200DWT HL-L6200DW HL-6200DWT HL-6400DW
Sometimes cartridge is installed – not recognised or shows empty
This issue relates to the Flag Gear found on the cartridge
“Most Brother Laser cartridges have a “Reset Flag”
On the side of the cartridges there is a little flag gear, which is basically a lever. When the cartridge is inserted into the printer for the first time and the printer engine runs, all the gears will motion and will release the flag gear forward. This flag gear moves forward and hits a sensor inside the printer. The sensor resets the toner level on the printer and this is how the toner level is monitored, the level will reset and count down till empty with no way to check during the countdown.
There are two positions for the reset flag and that is the “Unused” and the “Used” position. The flag gear is a moving part there is the chance for it to be ill-timed, miss it’s mark or not function correctly. This can occur with OEM ( Original Equipment manufacturer) as well as compatible cartridges, Brother have put a function within the printer to manually reset the toner levels.”
To manually reset the toner levels if the Flag Gear fails to do so, is quite easy to perform
1) Install cartridge/s into drum
2) Leave door open or open door if cartridge is installed
3) Press Secure/ Print and Cancel buttons at the same time
4) Arrow down to select correct cartridge needing to be reset.
5) Press OK
6) States Cartridge has been excepted
7) Close Door
8) Toner should be reset to READY.
Troubleshooting – Power Off – 10 Simple Steps

Power Off Theory
- With the printer TURNED ON
- Take cartridge out and close the door . (the one thats not recognised)
- Turn Power OFF AT THE WALL (Power point)
- Leave off for three to five minutes
- Turn Power ON
- Engine will run in most printers, when it stops open door
- Printer should now be looking for cartridge
- Reinstall cartridge
- Close door
- Cartridge should be accepted at this point
The above is provided for information purposes only. CartridgeMate does not make any representations or guarantees (express or implied) as to the accuracy, currency or authenticity of the information provided. CartridgeMate assumes no liability or responsibility for an errors
Difference Dye V Pigment Ink
Ever wondered what the difference between Dye and Pigment Ink
When it comes to printer ink, nothing is just cut and dried, plain and simple. Ink for your standard desktop printer generally falls into two major categories: pigment or dye based ink. Some major commercial applications require oil-based inks to satisfy their requirement or even Archival Inks (lasts up to 100 years without fading), but pigments and dyes dominate the home and office.
Pigment Ink
Let’s explain pigment ink, what it is and when it is used. A pigment is a dry, powdery substance that must be mixed with a liquid like water to leave behind black, white or colour. Without going into detail about the science of pigment ink, pigment is not necessarily water – soluble, it may remain suspended in the liquid (much as is the case for a “colloid*”). So what are the advantages of using pigment ink? Pigment particles tend to bond to edges within the chosen medium, a reason why these inks tend to last longer and resist fading over time.
When To Use Pigment Ink
Pigment inks in generally more suited to printing on polished surfaces, such as transparencies and stickers. They are also more expensive to produce with the colours produced are not as brilliant as with dyes. If you are printing an important image/document that you want to last for a long time, pigment inks are your best option. If you’re looking for bright colour at a lower cost, dye ink may be a better fit for you.
Dye Ink
Dye-based inks tend to be cheaper and water soluble, explaining why dye inks are more likely to smear. Dye ink generally takes more time to dry and results can be poor if a drop of water hit a page. So what’s the advantage of dye ink? Colour is more vibrant. Colours are brighter because various optical compounds are added to dye ink to enhance the colour. However, these compounds, like the dyes, have a low resistance to light or to UV rays, especially since dye-based inks are usually spread more thinly than pigment inks on the surface. Fading can be an issue if your document will be exposed to the sun, so dye inks aren’t perfect for printing things such as signs and banners that are shown in a window or outdoor. While dye ink has its drawbacks, advances in ink development have improved the fade resistance of dye inks. Big brands like Canon, Epson, HP & Fuji Xerox have improved the fade resistance quality of their dye-based inks, almost rivalling the quality of pigments.
Should I use dye or pigment ink for my printer?
So what is the best type of ink for your printer? The answer to this question depends on what you are printing. Screen Printing presses often use dye or pigment based inks. If you wish to print phones with brilliant colours, then a dye-based ink may be best. On the other hand, if you need to print contracts or text documents that need to last, a pigment-based ink is probably more suited. If exposure to sunlight won’t be a big issue, dyes can also be good for printing text documents because dyes tend to print darker than pigment-based dyes.
Now you know the difference between dye and pigment ink. If you can’t decide what type of ink you should use, don’t worry. In many cases, your printer manufacturer has already made this decision for you. If you’re wondering what kind of ink is in your cartridge, know that most black ink cartridges are filled with pigment ink, while colour ink cartridges usually take advantage of the favourable colour properties of dye-based inks. Either way, make sure you get the best price on bulk ink and inkjet cartridges at CartridgeMate
*A colloid is a solution that has particles ranging between 1 and 1000 nanometers in diameter, yet are still able to remain evenly distributed throughout the solution. These are also known as colloidal dispersions because the substances remain dispersed and do not settle to the bottom of the container
What To Look For When Selecting a Supplier
We are happy to have competitors who are honest in their dealings however just like people being more aggressive on the roads it appears that some will do anything to win a sale irrespective of whether it’s a quality product or service that meets the client’s needs
To reduce the risk we have compiled the following checklist
- Phone Number Should always show a phone number, if something goes wrong – who do you contact – not just a 1300 number (can be diverted to anywhere) – some sites have phone numbers in each state all are diverted to one phone – attempting to provide the illusion they are national some you can only contact via email
If in doubt always call to purchase via phone or prior to using on line – at least you have made contact and have a feeling of whom you are dealing with
- Physical Address (some suppliers have images of buildings and addresses that are not theirs or their address does no match their ABN address details – others just show a Post Office Box
- ABN numb er should match company name – (some don’t show) (check ABN lookup) see if they are registered for GST and also do a whois search on the domain name – all should match
- Technical support – very important – if there is a problem – do they know how to address – is it the product or the printer – they should know and be able to guide you
- How long have they been in business – we see companies start up and then disappear, generally they sell on price – whilst price is a factor, sales support, tech support are just as important should something go wrong.
- Site Security – we don’t know what others have – they may advise encrypted security, which may be true ( to a point), – checkout page should start with https/ – however they may receive your cc details via email and manually process payment though EFPOS machine. (if they don’t ask for CVC on site this may be a indication of manual transaction – leaving you susceptible to email internet fraud as well as your cc details being filed on a hard copy order somewhere.
CartridgeMate do not have access to your details –Card details are never stored and only passed securely to the Payment Gateway
Original Toners & Inks – why are some sites a lot cheaper – it could be old stock or redundant stock (they have a use by date). To be honest there should be very little difference between suppliers
Compatible Toners – some original equipment suppliers have additives that are required to work in conjunction with other components – if they are not added to compatible cartridge then damage may be caused to other components within printer – important that you are comparing the same product – if it’s cheaper then it’s possible that additives are not present
Compatible Inks – some original equipment manufacturer have for example several black inks – all very specific to each cartridge and printer type – if you select a supplier that does not provide the correct ink – eventually the print head may block or fail – a very costly component
We happily price match (where possible) however here are some of the factors we now have to take into consideration when quoting like for like simply because these extra costs are hidden
Supplier may not show GST – until checkout
Charge up to 4% for using any credit card
Charge delivery insurance (where you have to opt out rather than choosing yourself)
Charge excessive freight cost
Add these surcharges and compared to other suppliers prices you may paying more. These sites simply hope you get to checkout and cannot be bothered going elsewhere
Testimonials
We have seen a number of companies use trust pilot and note that all reviews were all from overseas (USA UK etc) and all reviews seem to be drip fed at odd times throughout 24 hour period – none of the companies that use this service ship outside Australia.
We contacted trust pilot as we were concerned as to how legitimate the reviews are, we received no response, however suddenly all reviews changed on these sites to being Australian only – to make up your own mind search reviews on trust pilot themselves and whirlpool feedback
Below is statement for Department of Fair Trade Website
It is unlawful to make false or misleading testimonials. Testimonials are statements from previous customers about their experience with a product or service. These can give consumers confidence in a product or service on the basis that another person – particularly a celebrity or well-known person – is satisfied with the goods or services. Misleading representations can persuade customers to buy something to their detriment, based on belief in the testimonial.
It really is a case of buyer beware – whilst price is a factor you should consider, after sales service, product knowledge, security.
INK EXPIRATION
What is ink expiration and will it make my HP ink supplies stop working?
What is ink expiration? Why does it exist? Is there something built into HP ink supplies that make them stop working on a certain date?
The simple fact is that most HP ink supplies do not have ink expiration dates, so few users are affected. Of the small percentage of HP ink supplies that do have ink expiration dates, some will, indeed, stop working on those dates, while others have dates that can be overridden—causing minimal impact to the overall printing experience.
What is ink expiration?
The ink expiration is a built-in date on the microchip wherby certain HP inkjet cartridge will stop working. Air ingestion and water evaporation can cause ink to change over time. In printing systems where the printhead and ink supply are separate, older ink can adversely impact the printhead and the ink delivery components within the printer. With ink expiration, however, HP can prevent this from happening.
Why ink expiration?
Why do any HP inkjet products have ink expiration dates?
To protect the printing system and ensure print quality, some ink cartridges will use an ink expiration date. If the cartridge still has ink on that date, it either stops operating or displays a warning message which the customer can override. As previously mentioned most HP ink supplies do not have ink expiration date. This issue affects only a small percentage of older HP ink supplies.
What is the ink expiration date?
It’s important to note that the ink expiration date is NOT the date stamped or printed on the ink supply. Rather, the printed date on all HP inkjet supplies is the “Warranty ends” date. To determine the ink expiration date on a particular supply, the consumer needs to consider three factors: the ink supply, its warranty date, and the date on which the cartridge is initially installed.
Which printers use ink expiration?
The table below provides additional information on the particular printers that use ink cartridges with ink expiration dates, whether or not the user can override the expiration date, and the process of determining the expiration date on those supplies with no override.
|
Ink expires, but you can override* |
Ink expires, no override* |
Ink does not expire |
|
| Printers | HP Officejet Pro 8000, 8500, K550, K5300, K5400, K8600, L7400, L7500, L7600, and L7700 SeriesHP Photosmart 3110, 3210, 3310, 8250, C5180, C6180, C6200, C7180, C7200, C8100, D6160, D7160, D7200, D7360, and D7400 series, HP Photosmart Pro B8800, B9180HP Designjet 510, 4000, 4500, 4X20, 5100, 5500, 8000, 9000, 10000, L25500, L26500, L28500, L65500, LX600, LX800, LX820, LX850, T610, T620, T770, T790, T1100, T1120, T1200, T1300, T2300 eMFP, T7100, Z2100, Z3100, Z3200, Z5200ps, Z6100, Z6200 series, HP CM8050 and CM8060 | HP Officejet Pro K850HP digital Copier Printer 610HP Business Inkjet – allHP Officejet D series, HP Officejet 7100 series, HP Officejet 9100 seriesHP Professional series (2000 and 2500)HP Color Inkjet cp1160 and cp1700 | All other HP printers. |
| When will expiration make my cartridges stop? | Able to continue after override. | Color Inkjet cp1160 series, Officejet d125xi, d135, d145, d155xi, 7110, 7130, 7140xi, HP Fax 610:12 months after the “Warranty Ends” date, or 18 months after the ink cartridge is installed, whichever comes first.All other printers: 24 months after the “Warranty Ends” date, or 30 months after the ink cartridge is installed, whichever comes first. | Do not expire. |
*Override—you can continue printing without replacing the ink cartridge, by following instructions on the printer, in the user manual, or in the ink cartridge expiration message on the computer screen.
Basic Colours Explained – Why Black is K

Black
The black colour can be defined as the absence of all other colours, as compared to white, which is a combination of all colours. The science behind the colour of black lies in the types of colour which are reflected back. Black is the absorption of all of the colours, with no colours reflected back to the human eye. Comparitively, white will reflect the entire colour spectrum back to the human eye, which then recombines them into the colour that we see and recognise as white.
Black can be printed by combining 100% of the Cyan, Magenta and Yellow colours (making a separate black cartridge redundant). However, this method has its drawbacks as often the colour produced is closer to grey than a true black. The benefits of a separate black cartridge also lie in its ability to be swapped out without wasting left-over ink from the other colours in that cartridge, as black ink is the predominant form of ink used.
To produce better results the four colour printing method CMYK is used where black is K and the fourth cartridge colour. This stands for Cyan, Magenta, Yellow and Black. K is used instead of B in this method to avoid confusion with the Red, Green, Blue (RGB) acronym where B is blue. The K used instead is derived from the German word ‘kohl’, meaning coal.
Cyan
Cyan is also called process blue and is one of the subtractive primary colours used in the CMYK or CMY colour methods (where CMY is just CMYK where black is derived from mixing the three colours, as explained above). This colour is primarily blue, with some green in it.
For printers using ink cartridges Cyan is either inserted as one of four cartridges (one for each of the Cyan, Magenta, Yellow and Black) or as a combined ink cartridge with Yellow and Magenta.
Magenta
Magenta is also called process red and is the second of three subtractive primary colours used in the CMYK and CMY methods. The magenta colour is greenless, meaning it absorbs all wavelengths of green light and predominantly red with a tinge of blue.
Like Cyan, Magenta is either inserted as one of four cartridges (one for each of the Cyan, Magenta, Yellow and Black) or as a combined ink cartridge with Yellow and Cyan.
Yellow
Yellow is the third and final subtractive primary colour used in the CMY and CMYK printing methods. Yellow is blueless, meaning that it absorbs all wavelengths of blue light.
Like the two other subtractive primary colours, Yellow is either inserted as one of four cartridges (one for each of the Cyan, Magenta, Yellow and Black) or as a combined ink cartridge with Cyan and Magenta.
Troubleshooting Guide
Common causes of a cartridge not recognised error:
- replacing cartridges before the printer has detected it’s out of ink or toner
- installing cartridges out of sequence
- touching electrical contacts on the cartridge with your bare hands
Each cartridge has an individual ID or a serial number that the printer uses to know if the cartridge is present. Occasionally if you install a new cartridge the printer is still looking for the old cartridge and will not recognise the ID of the new one.
This issue may be avoided by following a few simple steps.
Ink and Laser Cartridges
Follow this when the printer will not recognise the cartridge either by error message or flashing light.
- Take the cartridge out
- Turn power off at the wall socket (not printer)
- Wait 120 seconds (no less)
- Turn power back on at the wall socket
- Reinstall cartridge, referring to the operating manual instructions on cartridge installation.
At this point the cartridge should be recognised.
If after following the previous instructions and the ink cartridge still is not recognised, try the method below.
- Get some methylated spirits and a cotton tip (please follow safety instructions on bottle), dampen the cotton tip and then clean the electrical circuitry board on the cartridge.
- At this point, you should also clean the cartridge carriage electrical board. Open the printer lid, wait for the carriage to come to the middle (by turning on the printer), and then turning the power off at the wall.
- This will allow the cartridge to move freely and be safe to clean. The next step is to lightly wipe the cotton tip, dampened with methylated spirits, over the electrical contacts. This will remove any ink splatter and film built up on the contacts.
- Finally, return the carriage to where it had stopped when you turned the printer off, then turn the power back on. The carriage will go back to the loading position, and you will be able to install the cartridges. Do this next according to your printer instructions, however, usually you will need to put the colour cartridge in first, as this is the sequence required for printer recognition.
Colour Ink and Laser Cartridges

When changing empty colour cartridges you should only change one at a time, starting with the colour that first came up empty.
Note: Only remove empty cartridges that the printer has prompted you to.
- When notified of an empty toner or ink cartridge, remove and install the replacement for, that cartridge only.
- If more than one cartridge is empty, proceed to remove the next cartridge that is asked for.
- Do not remove all cartridges at the same time, as this confuses the printer such that it might fail to read its status correctly
Incorrectly installed cartridges will bring up a ‘not-recognised’ cartridge error message on the printer menu, printer status on your computer or flashing light on the printer.
Poor Print Quality – Inkjet cartridges with Built-in Print Head

- Try print-head clean
- Run the test page to see if print quality has improved. If not, try step 3
- Take cartridge out, fold a tissue in half, and then in half again. Place the ink cartridge (print head down) on the tissue to see if you have a good ink blot.
- If the blot is good, clean the electrical contacts on the side of the cartridge, and in the printer with a cotton tip dampened with methylated spirits. There may be ink or other foreign matter on them. Do not touch the contacts with your bare hands as the oil and moisture on your fingers can damage the electrical properties of the contacts.
Try the next procedure if the above steps do not improve print quality, or if the print head is blocked (refer to blot test).
- Heat water approximately 4/5mm deep in a saucer so that it is hot but not boiling. Sit the cartridge
 print-head into the water with the cartridge in an upright position and let it soak for five minutes. You can put 20mls of blue windex in the water if you have it. DO NOT USE ANY OTHER CHEMICALS.
 - Remove the cartridge from the water, pat dry moisture from the print head onto folded tissue.
- Wipe a dry cotton tip over the electrical contacts so that there is no moisture on these when installing.
- You may need to repeat the soaking a number of times to overcome dry ink in jets.
