Troubleshooting Guide
Common causes of a cartridge not recognised error:
- replacing cartridges before the printer has detected it’s out of ink or toner
- installing cartridges out of sequence
- touching electrical contacts on the cartridge with your bare hands
Each cartridge has an individual ID or a serial number that the printer uses to know if the cartridge is present. Occasionally if you install a new cartridge the printer is still looking for the old cartridge and will not recognise the ID of the new one.
This issue may be avoided by following a few simple steps.
Ink and Laser Cartridges
Follow this when the printer will not recognise the cartridge either by error message or flashing light.
- Take the cartridge out
- Turn power off at the wall socket (not printer)
- Wait 120 seconds (no less)
- Turn power back on at the wall socket
- Reinstall cartridge, referring to the operating manual instructions on cartridge installation.
At this point the cartridge should be recognised.
If after following the previous instructions and the ink cartridge still is not recognised, try the method below.
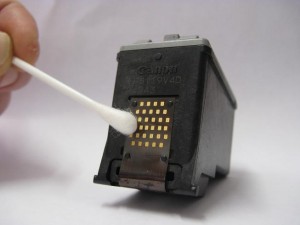
- Get some methylated spirits and a cotton tip (please follow safety instructions on bottle), dampen the cotton tip and then clean the electrical circuitry board on the cartridge.
- At this point, you should also clean the cartridge carriage electrical board. Open the printer lid, wait for the carriage to come to the middle (by turning on the printer), and then turning the power off at the wall.
- This will allow the cartridge to move freely and be safe to clean. The next step is to lightly wipe the cotton tip, dampened with methylated spirits, over the electrical contacts. This will remove any ink splatter and film built up on the contacts.
- Finally, return the carriage to where it had stopped when you turned the printer off, then turn the power back on. The carriage will go back to the loading position, and you will be able to install the cartridges. Do this next according to your printer instructions, however, usually you will need to put the colour cartridge in first, as this is the sequence required for printer recognition.
Colour Ink and Laser Cartridges
When changing empty colour cartridges you should only change one at a time, starting with the colour that first came up empty.
Note: Only remove empty cartridges that the printer has prompted you to.
- When notified of an empty toner or ink cartridge, remove and install the replacement for, that cartridge only.
- If more than one cartridge is empty, proceed to remove the next cartridge that is asked for.
- Do not remove all cartridges at the same time, as this confuses the printer such that it might fail to read its status correctly
Incorrectly installed cartridges will bring up a ‘not-recognised’ cartridge error message on the printer menu, printer status on your computer or flashing light on the printer.
Poor Print Quality – Inkjet cartridges with Built-in Print Head
- Try print-head clean
- Run the test page to see if print quality has improved. If not, try step 3
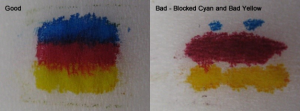
- Take cartridge out, fold a tissue in half, and then in half again. Place the ink cartridge (print head down) on the tissue to see if you have a good ink blot.
- If the blot is good, clean the electrical contacts on the side of the cartridge, and in the printer with a cotton tip dampened with methylated spirits. There may be ink or other foreign matter on them. Do not touch the contacts with your bare hands as the oil and moisture on your fingers can damage the electrical properties of the contacts.
Try the next procedure if the above steps do not improve print quality, or if the print head is blocked (refer to blot test).
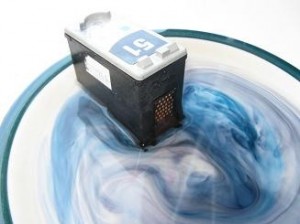
- Heat water approximately 4/5mm deep in a saucer so that it is hot but not boiling. Sit the cartridge
 print-head into the water with the cartridge in an upright position and let it soak for five minutes. You can put 20mls of blue windex in the water if you have it. DO NOT USE ANY OTHER CHEMICALS.
 - Remove the cartridge from the water, pat dry moisture from the print head onto folded tissue.
- Wipe a dry cotton tip over the electrical contacts so that there is no moisture on these when installing.
- You may need to repeat the soaking a number of times to overcome dry ink in jets.
Comments are closed!


